DVT e Language IDE User Guide
Rev. 24.1.9, 26 April 2024
- Installation Checklist
- Predefined Projects
- Getting Started
- What is a Workspace
- What is a Project
- Project Natures
- Workspace and Workbench
- Refresh
- Linked Resources
- Backup and Local History
- Basic Tutorial
- Switch to the DVT Perspective
- Open a Project
- Configure the Build
- Build the Project
- Inspect the Compilation Errors
- See Comments in Tooltips
- Use Hyperlinks to Move Around in the Code
- Quickly Open a Type (Struct, Unit)
- Quickly Open a File
- Quickly Move Inside the Editor
- Browse Through All the Available Types (Structs, Units, Enumerations)
- Browse the AOP Extensions
- Inspect the Struct Hierarchy and Struct Members
- Inspect the Verification Hierarchy
- Search for Entities
- Use Content Assist (Autocomplete)
- Use Code Templates
- Track Tasks using TODO Markers
- Format the Source Code
- Quickly See the Current Scope in the Status Bar
- Locate the Matching Bracket
- Fold Code Regions in Order to Improve Readability
- Load in Specman
- Build Configurations
- Non-top files
- default.build
- Auto-config
- Simulator Log-config
- Emulating compiler invocations
- Multiple .build Files
- Compatibility Modes
- Paths
- Strings
- Comments
- Environment Variables
- Including Other Argument Files
- Build Persistence
- DVT Auto-Linked
- Run a Script Before Build
- All Build Directives
- e Language Test Files
- e Language SPECMAN_PATH
- SystemVerilog OVM or UVM Library Compilation
- Xilinx Libraries Compilation
- Intel(Altera) Quartus Libraries Compilation
- Questa Libraries Compilation
- Use of External Programs
- Breadcrumb Navigation Bar
- Compile Checks
- Content Assist (Autocomplete)
- Quick Fix Proposals
- Quick Assist Proposals
- Content Filters
- Code Templates
- File Templates
- Project Templates
- Code Formatting
- Inspect Extensions (Layers)
- Override Methods
- Extend Annotation
- Semantic Search
- Search for References (Usages, Readers or Writers)
- Show Instances
- Show Constraints
- Show Emitters
- Quick Search in Views
- Refactoring
- Diagrams
- Export HTML Documentation
- External Tools Integration
- Debugger Integration
- Custom Dialogs
- Command Line Interface
- dvt_cli.sh
- Syntax
- Examples
- Makefile Example
- Commands
- Create a Project (Mixed-Language Capable)
- Create a Project From an Existing Template
- Import an Existing Project
- List Compiled Files
- Compare Files
- Launch a Run Configuration
- Open a File
- Close a File
- Open a Custom Dialog
- Open a Perspective
- Refresh a Project
- Rebuild a Project
- Print Edited File
- Quit
- Query the running status
- Print version
- Run Performance Exploration
- Macros Support
- Reminders (TODO Markers)
- UVM Support
- Settings Management
- Reference
- Comments Formatting
- Common Shortcuts
- Custom Pragmas
- DVT Resource Monitor
- Editor Right Click Menu
- Hyperlinks
- Icons and Decorations
- Lazy Bring up Resources
- Memory Monitor
- Scripts
- Syntax Coloring
- Themes
- Tooltips
- Toolbar Actions
- Views
- Application Notes
- > Tips and Tricks
- Q & A
- I am new to Eclipse, where should I start from?
- Where can I find DVT Help?
- How do I see and configure the key shortcuts?
- Are there any backup files in Eclipse?
- Workspace in use, cannot launch eclipse...
- Locking is not possible in the directory...
- How to start DVT Eclipse with a different eclipse.ini
- Save could not be completed
- IBM Clearcase Plugin
- How do I Access Files Outside Project Dir - Working with Linked Resources
- Handling UNRECOGNIZED Macros
- Mapping Linux to Windows (/proj/ to Z:\proj\)
- How to use Working Sets for filtering Problems/Task/Search views?
- Whitespace in macro definition
- Subversive vs Subclipse
- How do I associate a project with both DVT and CDT?
- Can I use vi/vim along with DVT?
- Can I perform dos2unix or unix2dos from DVT?
- How can I configure Eclipse to use a local CVS repository?
- I am using the Common Desktop Environment via Citrix and experiencing crashes. What can I do?
- How do I change the background color of the Editor?
- Some widget colors are not displayed properly. What can I do?
- How do I change the tooltip colors?
- How do I change Internet Proxy Settings?
- Eclipse does not start, there is no Workspace, metadata or log file created
- Workspace permissions
- How do I link mylyn with Bugzilla?
- How do I print source code?
- How do I disable Eclipse Software Sites?
- How do I revert to a previous version?
- What are the most common shortcuts in DVT?
- How do I run Specman using IntelliGen?
- How does DVT integrate with emacs?
- How does DVT integrate with CVS?
- How to set an environment variable within a Run Configuration?
- How to run a remote Unix command from DVT Eclipse for Windows?
- How do I tell DVT to skip some files from compilation?
- Rebuild shortcut (Ctrl + Alt + R) does not work
- I want to use an alias in a DVT Generic Run Configuration, but it's not recognized
- Some files are missing from the VIPs transformed with evip2dvt.sh
- How to set multiple paths as sources of predefined projects ?
- Lines are suddenly changing indentation when I edit text or move the cursor through the editor.
- How to change the directory where the build log file is saved ?
- How to find the DVT logs on Linux/Unix ?
- How to create resource filters ?
- How to create custom shortcut and button for a Run Configuration?
- I know that file.foo is present in the project location, but I can't see it in the Navigator View
- How to copy the full path to the file in the current editor?
- How to adjust the console logs filters matching parameters?
- When I switch to Block (Column) Selection mode the font changes
- In Block (Column) Selection mode I see strange editng artifacts
- How to modify the font size in the code editors?
- How to automatically checkout/lock files from the revision control system ?
- How can I see if a file is read-only?
- How can I open a file in DVT from the terminal?
- How can I open a file in DVT from Questa?
- How do I change the name of the xterm opened by a DVT Generic Run Configuration?
- I get errors while installing or updating a plugin from an update site
- What is New?
- How to Report an Issue?
- Legal Notices
- Third Party Licenses
The following tips and tricks give some helpful ideas for increasing your productivity.
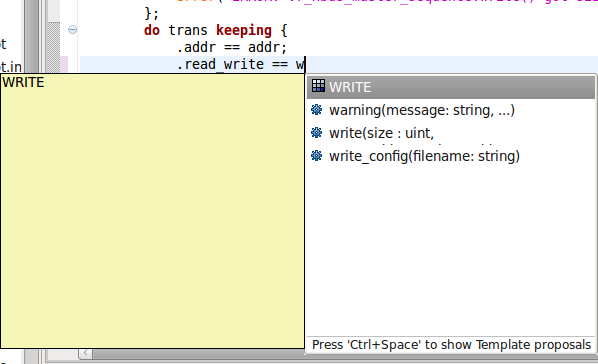
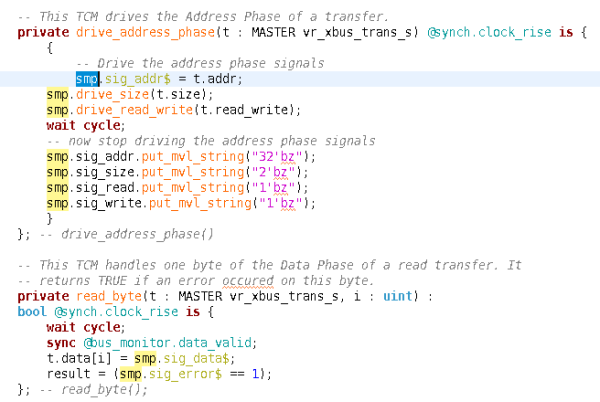
| Content assist | Content assist provides you with a list of suggested completions for partially entered text. In the e Language editor press
Ctrl+Space.
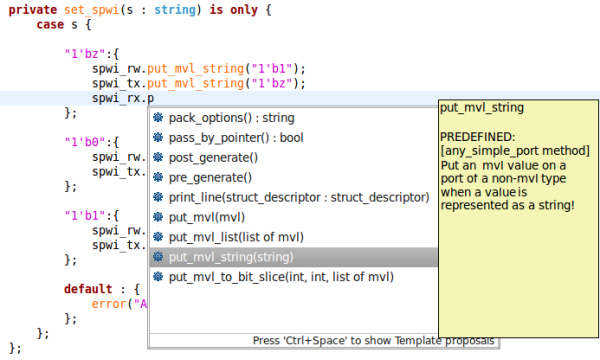 |
| Content assist for enumerated types | You can use content assist to speed up the access to enum items. Just press
Ctrl+Space.
 |
| Content assist for macros | You can use content assist to speed up the access to macros. Just press
Ctrl+Space.
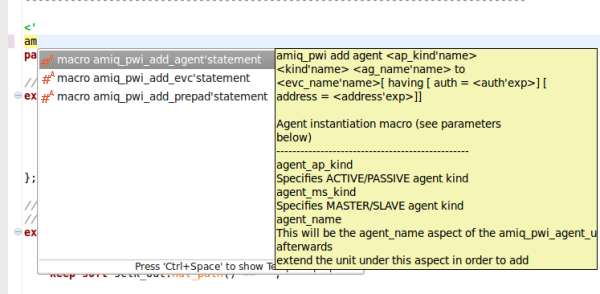 |
| Code templates | Code templates are presented in content assist if applicable.

 |
| Matching brackets | To find a matching bracket place the cursor after the bracket and press
Ctrl+Shift+P or choose
Source > Jump To Pair Bracket from the right click menu. You can also
double click after the bracket - this selects the text between the two brackets.
 |
| Toggle comment | You can toggle comment on/off for the current line or the selected lines. Press
Ctrl+/ or from the right click menu in editor
Source > Toggle Comment. You can choose the Verilog or the VHDL comment style. Right click in the editor and use the switch comment style action.
 |
| Expand/Restore Selection | Press
Shift + Alt + Up Arrow to incrementally expand the current selection. For example when the cursor is on a word, select the word. Press again to select the whole line. Then, each of the nested enclosing scopes is selected, for example the current action block, then the enclosing function, then the enclosing struct and so on. The same principle applies to nested enclosing parentheses, brackets and curly braces, as well as strings.
|
| Format source | Use the Format Source action from the editor right click menu Source > Format Source. The whole file is formatted or the current selection, if any. |
| One key indentation | If you press Tab once at the beginning of a line, it is automatically aligned to the enclosing context.Press twice to insert a tab. |
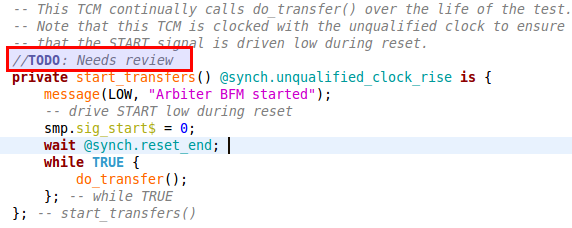
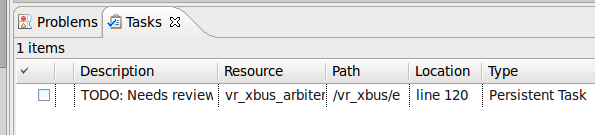
| Reminders (TODO markers) | When you tag a comment in e source code with
TODO, a corresponding task is automatically created as a reminder.From the Tasks View, double click on the task takes you to the
TODO in the code.Same for for
FIXME (higher priority) and
XXX (lower priority) markers.You can also add your own tags, see the Reminders (TODO Markers) section of the documentation.
 |
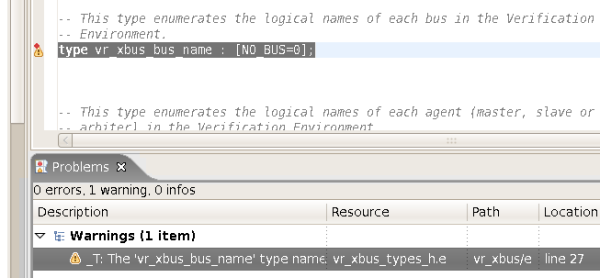
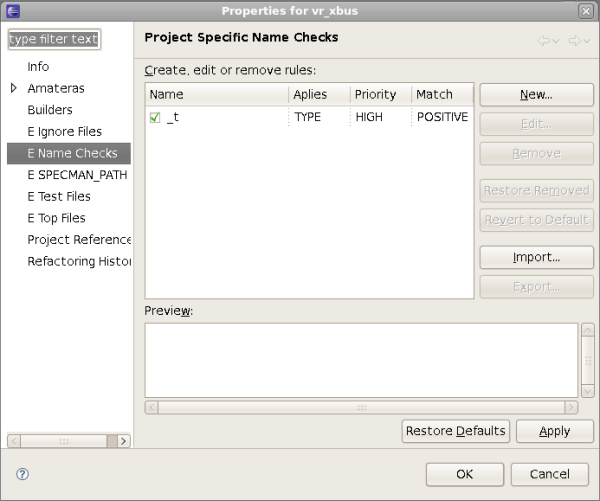
| Check Naming Conventions | Naming convention violations are presented as warnings in the Problems View. You can show the Problems View from menu
Window > Show View > Other > General > Problems. Double clicking on some warning will jump to the source location.
 |
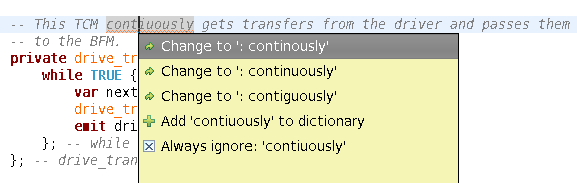
| Spell checking | You can enable spell-checking support in the e Language editor on the Opens the spelling preference page
General > Editors > Text Editors > Spelling preference page. Spelling errors are displayed in the e Language editor and corresponding Quick Fixes are available:
|
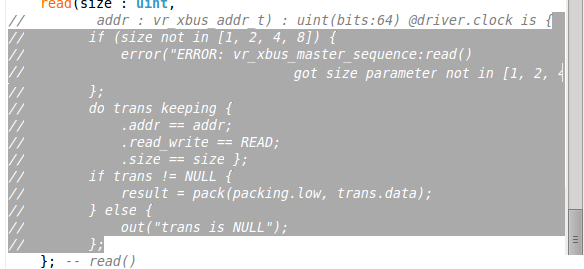
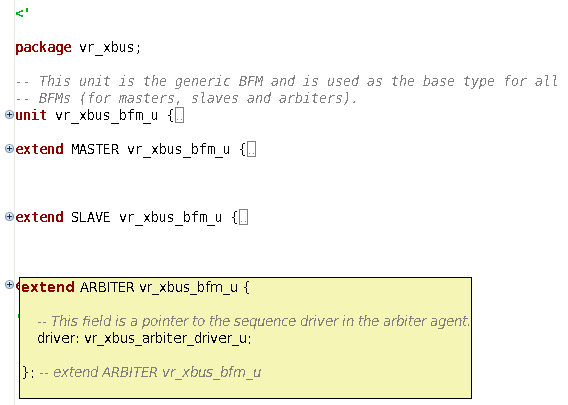
| Folding | You can fold code sections to improve read-ability. This is how a folded file looks like:
|
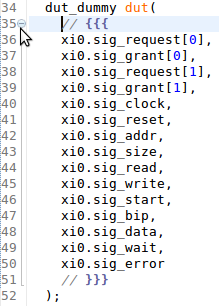
| Folding custom areas | You can define custom folding areas using comments to indicate the start and the end of the area:
 |
| Maximize editor | Double-click on the editor tab to maximize editor to full window. Double-click again to restore. |
| Show line numbers | Check Show line numbers from the Opens the general text editor preference page General > Editors > Text Editors preference page |
| Local history | Whenever you edit a file, its previous contents are kept in the local history. Right click in the editor and choose
Compare With/Replace With > Local History....
 |
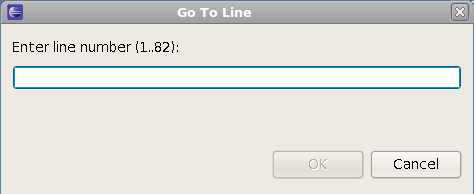
| Go to line | Press
Ctrl+L shortcut or
double click in the status bar to jump to a specific line.

 |
| Back/Forward navigation | You can navigate between editors in a browser like way using the Back/Forward Navigation Back/Forward Buttons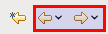 . . |
| Go to last edit location | Useful when you navigated around in the code, before proceeding with the source change. Click on
Last Edit Location button 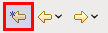 in the toolbar to jump to the file where you were previously editing. in the toolbar to jump to the file where you were previously editing.
|
| Local history | Whenever you edit a file, its previous contents are kept in the local history. Right click in the editor and choose
Compare With/Replace With > Local History....
|
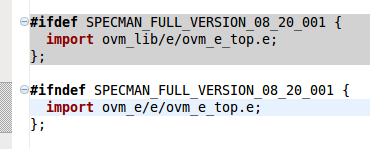
| Inactive code highlight | The editor marks with a colored background the areas of code that are not compiled due to preprocessing. See the
Inactive Code Highlight documentation section.
 |
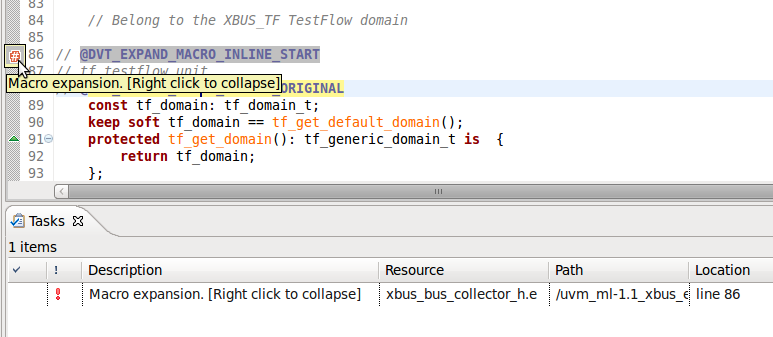
| Macro expansion | You can apply preprocessing for a macro called in your code.Place the cursor on the macro, then
right click > Macros > Expand All Levels to inspect the expanded macro in a new file.
|
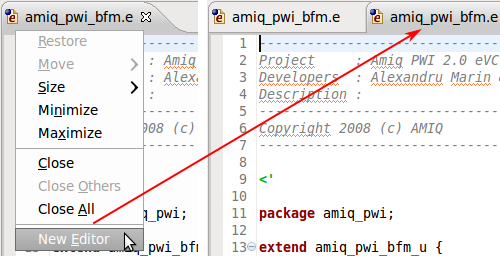
| Open file in more editors | To open multiple editors for the same file you should first open the file then right click on the editor's titlebar and select
New Editor
 |
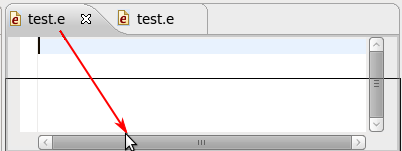
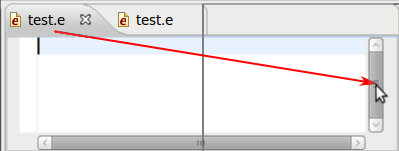
| Split the editor view | To open multiple editors side by side follow these steps:
 |
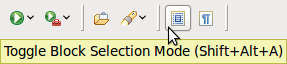
| Column selection | You can switch to and from column (block) selection mode either by clicking on the Toggle Block Selection Mode button in the toolbar, or by using the
<Shift + Alt + A> shortcut key.
 |
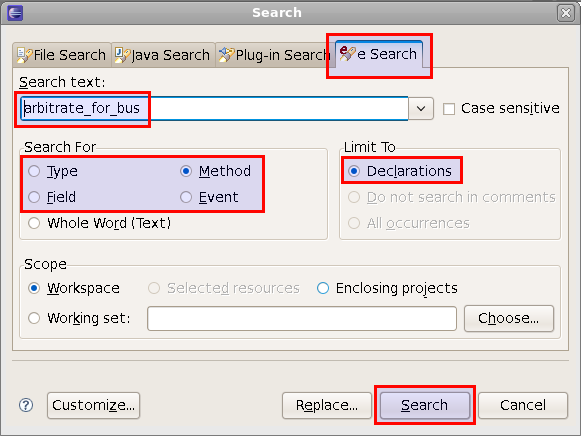
| Search for method, field, event etc. | To search for the declaration of a specific type, method, field etc. :
 |
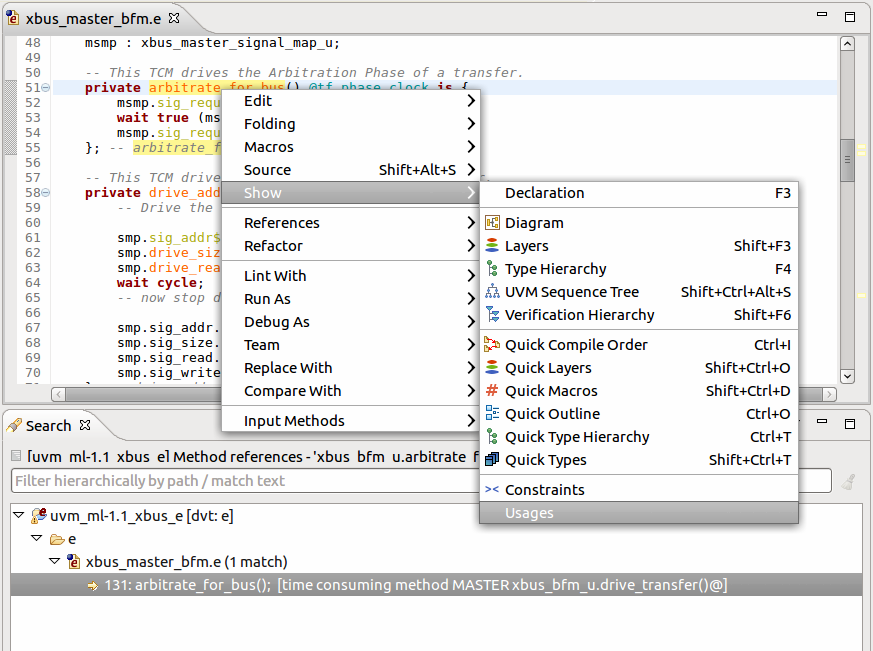
| Search for references | To search where a method (or field etc.) is used,
hold Ctrl, hover over it's name and select Show Usages or
right click on it's name > Show > Usages or
right click on it's name > References > Project. The results are presented in the
Search View. You can also search for references from the
Search Dialog (Ctrl+H).
 |
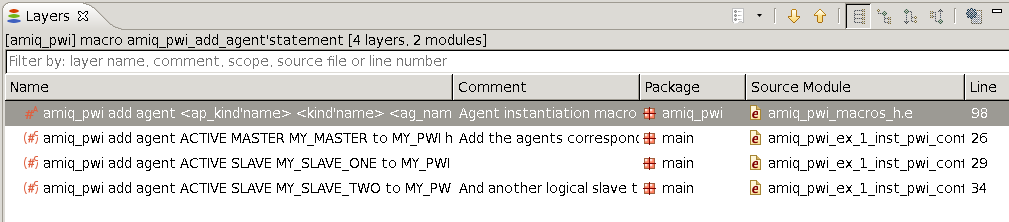
| See macro instances | To see where a macro is used
click on it and press Shift+F3. The results are presented in the
Layers View.
 |
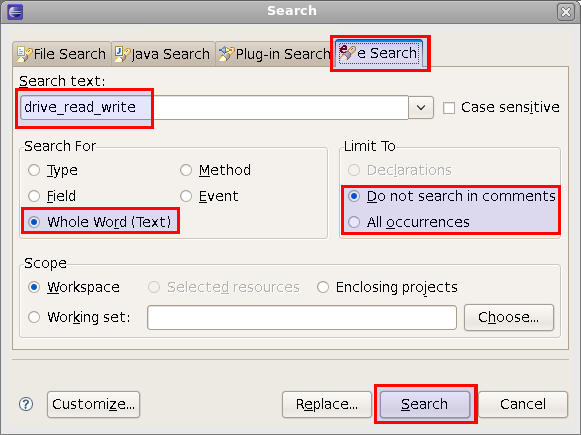
| Search for whole word | To search for a whole word in all e files, in comments or not:
 |
| Tooltips | When you position the mouse over a type, method, field etc., a tooltip will pop-up showing information on corresponding declaration.
 |
| Hyperlinks | If you
place the mouse over a type, method, field etc. and
press the Ctrl key, a hyperlink will be presented.
Click on the hyperlink to jump to definition. You can also jump to a definition if you put the cursor on the relevant name and
press F3.
 |
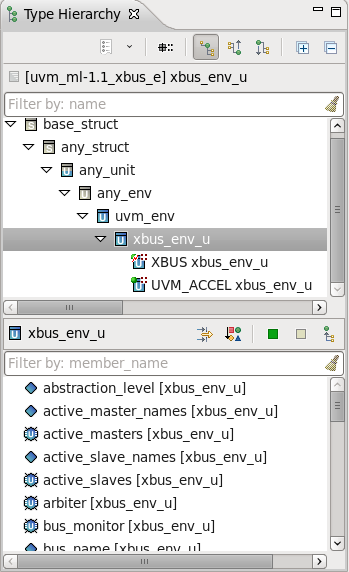
| Inheritance tree and members (Type Hierarchy View) | You can view the inheritance tree and all the members of a struct by
placing the mouse over it and pressing the
F4 key. See also
Type Hierarchy View.
 |
| Verification Hierarchy of a unit (Verification Hierarchy View) | You can view the Verification Hierarchy View of a unit (including ports) by placing the mouse over it and pressing Shift+F6. |
| Class Diagrams | You can create class diagrams to inspect or document the architecture of a verification environment. For more details see the Diagrams -> Class Diagrams |
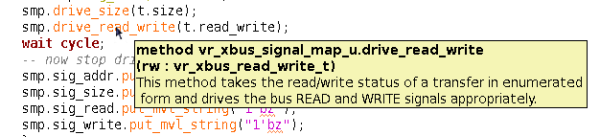
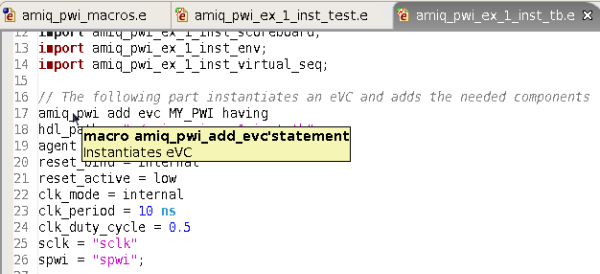
| Macro Hyperlinks and Tooltips | If you
place the mouse over a macro you'll see a tooltip with the documentation. Define as macro tooltip example:

 |
| Scope | Your current scope (for example the method or struct you are editing) is always presented in the status bar.
 |
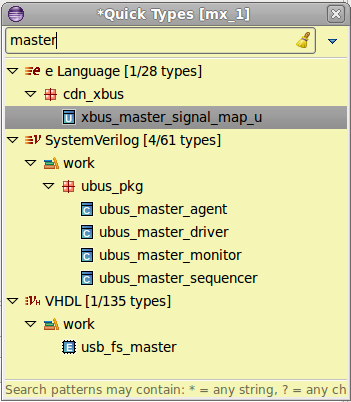
| Quick Types | You can quickly open a specific type definition, just press
Ctrl+Shift+T. The Quick Types View will pop-up and you can enter any regular expression to locate a type. Select and press Enter or click to jump to its definition.
 |
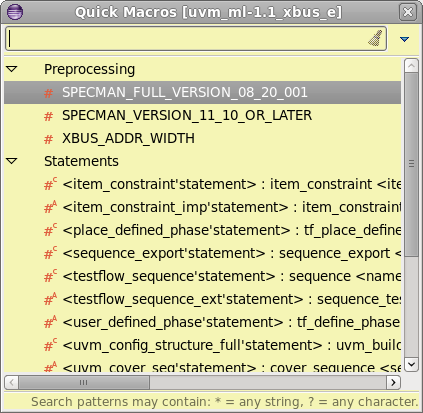
| Quick Macros | Press
Ctrl+Shift+D to open the
Quick Macros View. It presents the available macros, both preprocessing and define as. You can enter any regular expression to locate a macro and jump to its definition (select and press
Enter or
click).
 |
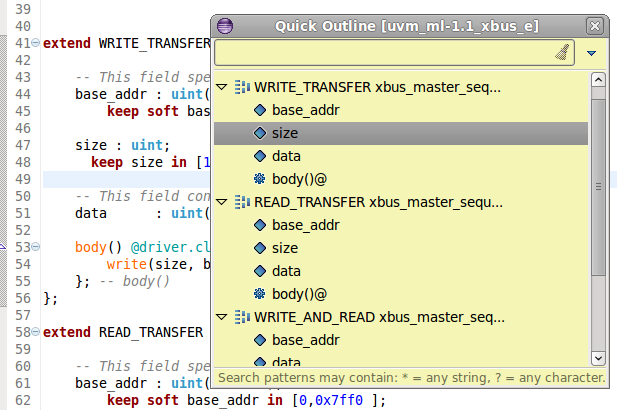
| Quick Outline | Press
Ctrl+O to open the
Quick Outline View. It presents an overview of your file. You can enter any regular expression to locate a place to jump in the current file.
 |
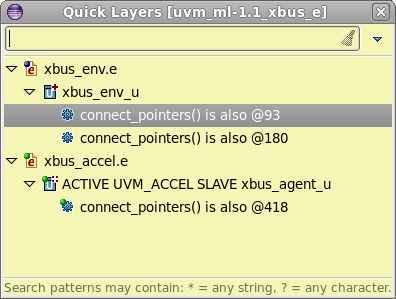
| Quick Layers | Press
Ctrl+Shift+O with the cursor positioned on the name to quickly see extensions.
 |
| Quickly jump to a layer of a field's type | Press Ctrl+Shift+O twice with the cursor positioned on the field name (first time shows the field layers, second time the layers of the type of the field). Then you can use the filter to jump to the desired layer. |
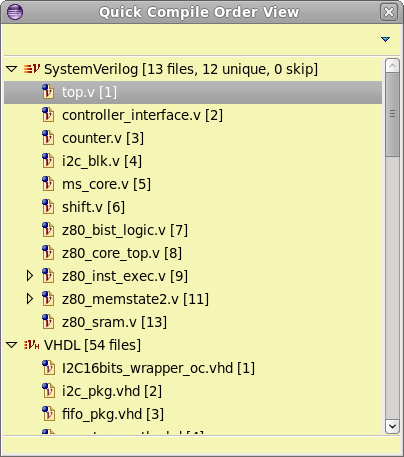
| Quick Compile Order | You can quickly open a compiled file. Just press
Ctrl+I.The Quick Compile Order View will pop-up and you can enter any regular expression to locate a file. Select and press
Enter or
click to open the file.
 |
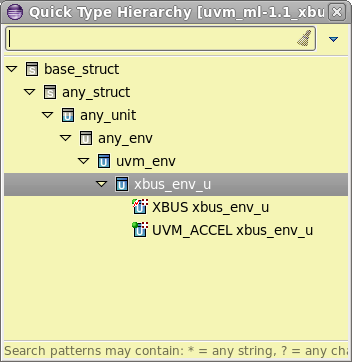
| Quick Hierarchy | Position the cursor on the struct name and press
Ctrl+T to see the
Quick Type Hierarchy View.
 |
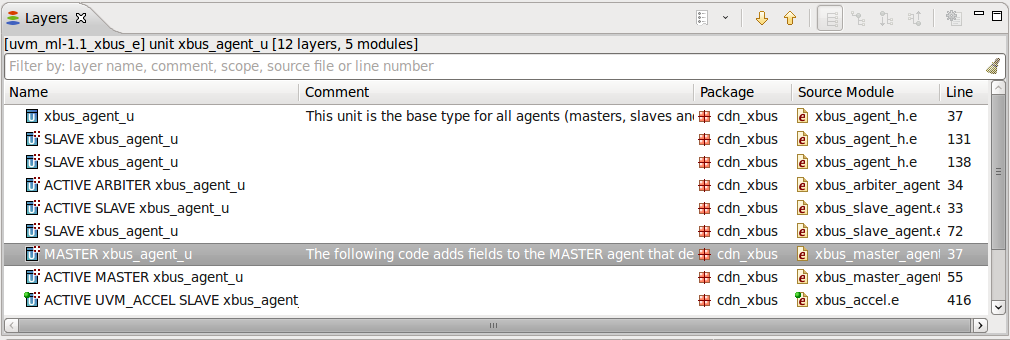
| Layers | You can view all the extensions (layers) of a specific type, method, event etc. Position the cursor on the relevant name and press
Shift+F3 or
right click and choose
Show > Layers from the menu. See
Layers View.
 |
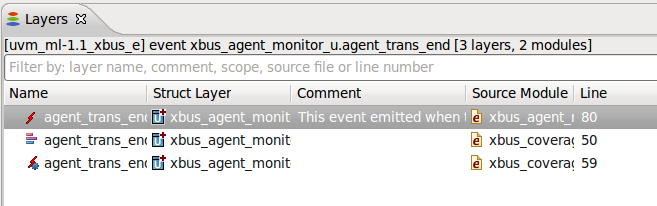
| Event Layers | Layers include
on and
cover definition.Position the cursor on the event name and press
Shift+F3 or
right click and choose Show Layers from the menu. See also
Layers View.
 |
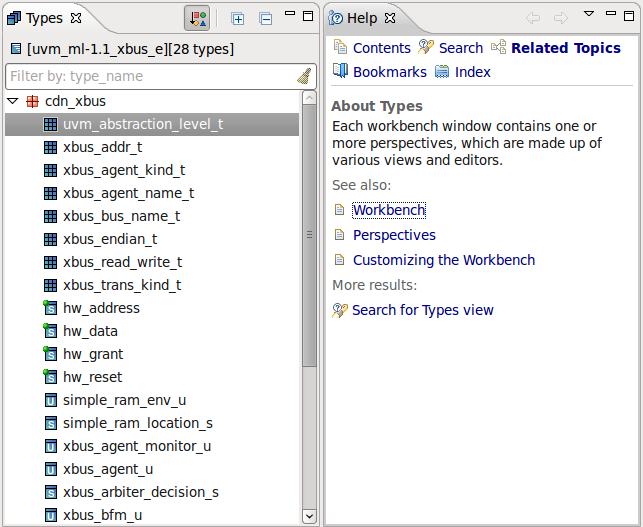
| Types | You can view all types (enums, structs) in the project (including each struct fields, methods etc.) in the Types View. Open the view from menu Window > Show View > Other... > DVT > Types. |
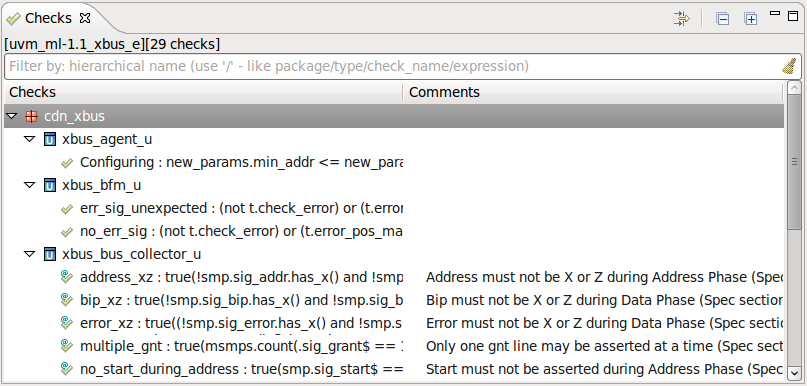
| Checks | You can view all the checks ("check that", "expect", "assert", "assume") in the project in the
Checks View. Open the view from menu
Window > Show View > Other... > DVT > Checks.
 |
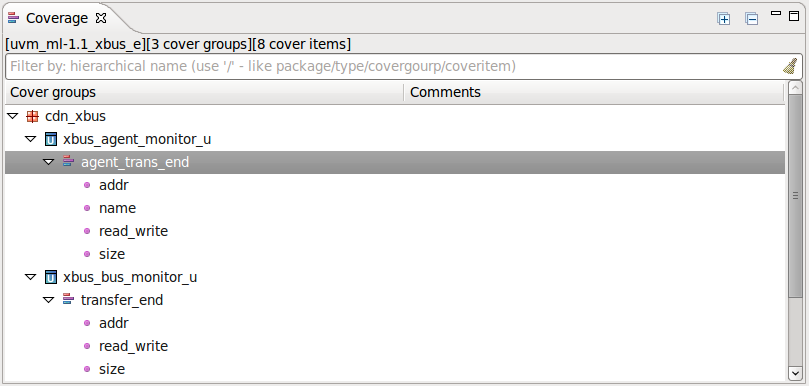
| Coverage | You can browse all the coverage definitions in the project using the
Coverage View. Open the view from menu
Window > Show View > Other... > DVT > Coverage.
 |
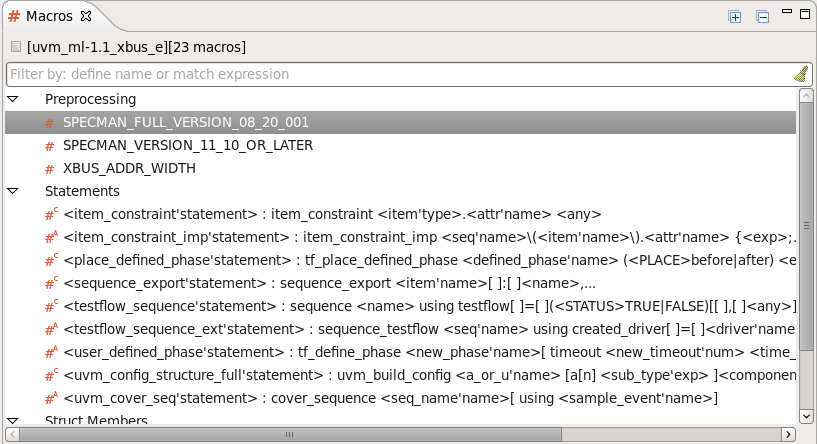
| Macros | You can see the macros in your project in the
Macros View.Open the view from menu
Window > Show View > Other... > DVT > Macros.
Double click to jump to macro definition.
 |
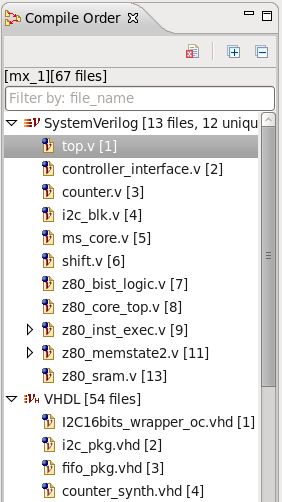
| Compile Order | You can see the compile order of the files in your project in the
Compile Order View. Open the view from menu
Window > Show View > Other... > DVT > Compile Order.
 |
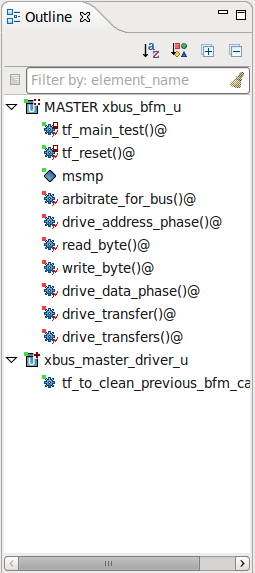
| Outline | You can see the summary contents of the current file (structs, field, methods) in the
Outline View. Open the view from menu
Window > Show View > Other... > General > Outline.
 |
| Mark occurrences | When working in the e Language editor, turn on
Mark Occurrences in the toolbar
 |
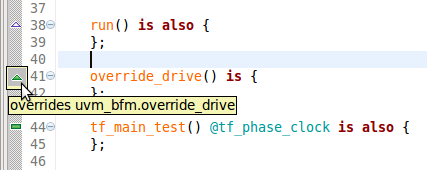
| Override Annotations |
Override Annotations are markers that display special decoration icons to indicate that a method or TCM overrides a
like super-type.
 |
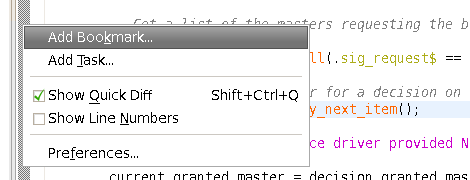
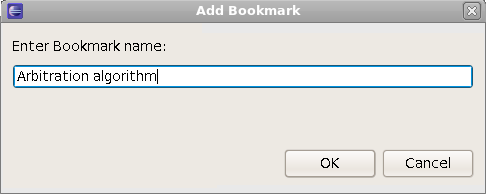
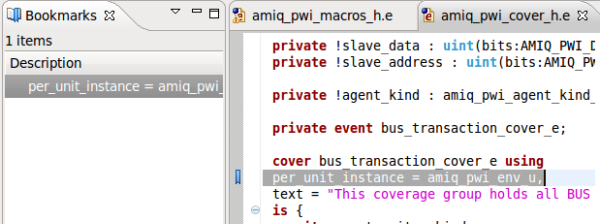
| Bookmarks | Similar with a web browser, you can add bookmarks in your code without altering the code.
Right click on the left vertical bar of the editor and choose
Add Bookmark...
 |
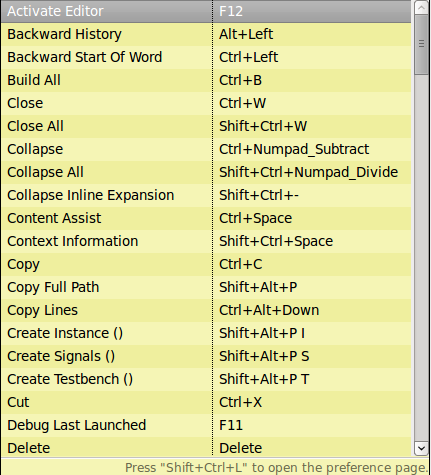
| All shortcuts | Press
Ctrl+Shift+L to see all shortcuts.
 |
| Project Properties | Select the project in the Navigator View, right click and choose Properties.Or from menu Project > Properties. |
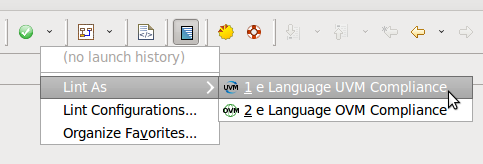
| OVM Compliance Review | To perform the OVM compliance review of your project click the
lint button in the toolbar
 |
| Project Templates | A project template is a parameterized directory tree. Both in the file contents (.e, ,.sh - practically any file) and in the file or directory names you can use parameters.Combined with TODO markers, you can use a project template as a customized wizard.For more details see the Project Templates chapter in EDT User Guide. |
| System Variables | See: Build_Configurations |
| Generic launch (make, scripts etc.) | See: Run_Configurations |
| Create dialogs for scripts & flows | You can create
Custom Dialogs for your own scripts:
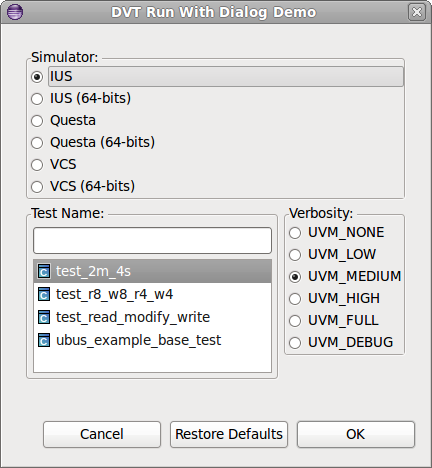
|
| Open terminal | You can open a fully working command-line terminal inside of DVT: In the Navigator View right-click on the desired location and select Open Terminal Here |
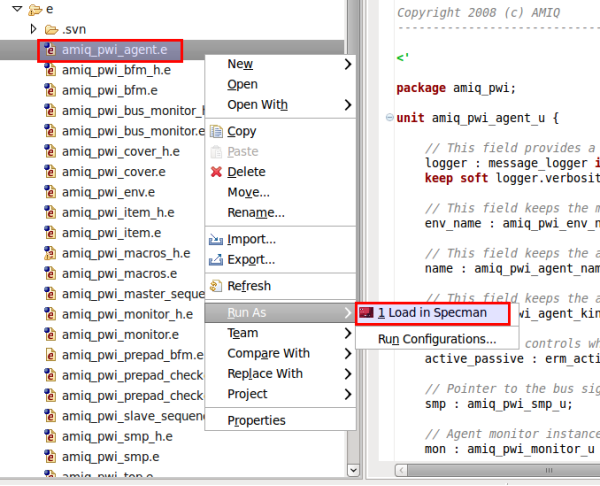
| Load in Specman | Right click on a file in Navigator (usually top or test) and from menu
Run As choose
Load in Specman.
 |
| External Builders | An external builder allows you to invoke any script/tool and back-annotate its output (errors, warnings etc.) to the source code. Practically it allows you to connect any 3d party tool (compiler, linter etc.) to DVT error signaling engines. For more details see External Builders. |
| External Documentation | You can browse and search through 3rd party documentation using the Eclipse help system.For more details see the External Tools > External Documentation chapter in EDT User Guide. |
| Context Sensitive Help | A focused set of help topics that is related to the current context can be shown to users on demand using context-sensitive help. This form of user assistance is delivered to users when a platform-specific trigger is activated (e.g. F1 key on Windows, Ctrl+F1 on GTK, Help key on Carbon).For more details see the
Getting Started > Context Sensitive Help chapter in
EDT User Guide.
 |
| Mapping Linux to Windows (/proj/ to Z:\proj\) | Linux directories can be mapped to Windows drives in order to access them from Windows. For example /home/simi is mapped to Z:\. This has an impact on paths configured for a DVT project, for example INCDIRs etc. The paths are set using Linux conventions, however Eclipse runs in Windows and the DVT builder needs to know about the mapping in order to compile the files. To specify the mapping, set the system variable %DVT_CROSSPLATFORM_MAP% before invoking Eclipse. You can add multiple mappings separated by ";" e.g.: /projects/=p:\;/home/lars/=Z:\lars\ |
| Recover from abnormal inconsistencies | In the event of a disfunction (missing results in search, types in type browsing, hyperlinks, tooltips etc.) please manually trigger a rebuild |
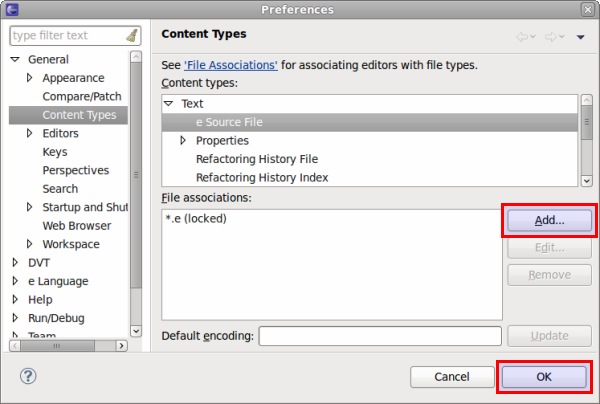
| Add a new file extension to compile list extensions | Go to
Window > Preferences > General > Content Types, select a category from the list (for example
e Source File) then click on
Add and then on
Ok.
 |
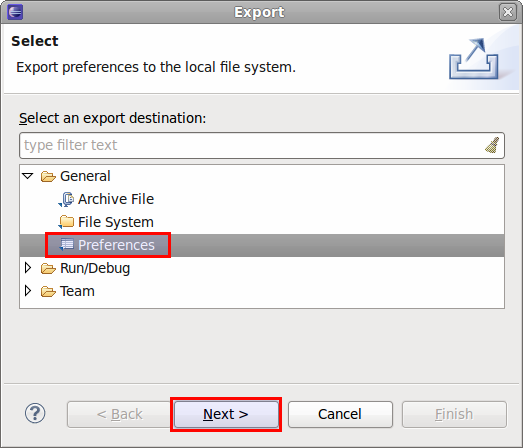
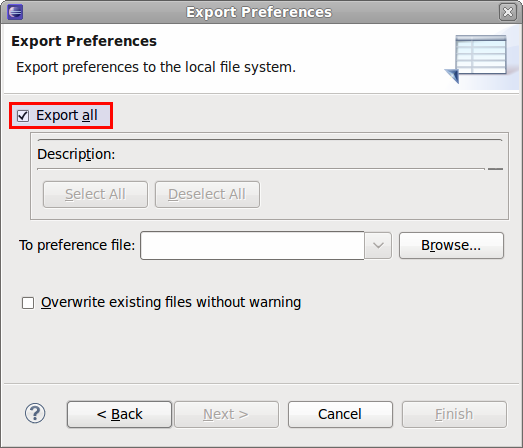
| Share workspace settings | Export all Workspace/ Eclipse customization:- Go to
File > Export > General > Preferences - Make sure
Export all is selected - Select a file where the preferences should be exported. Now you can share this file with your team. When it is imported into another instance of Eclipse (by using
File > Import > General > Preferences), the configuration (all options available in
Window > Preferences) is replaced by the imported one.
Note: you should restart Eclipse for the changes to be enforced (
File > Restart).
  |
| Using System Varibles in Linked Resources | You can use System Variables in the path of linked resources. For example ${DVT_ENV-SYSTEM_VARIABLE_NAME}/work is equivalent to $SYSTEM_VARIABLE_NAME/work in a console. |
| Waive problems reported by DVT | You can use
Compile Waivers to promote, demote or disable the problems reported by DVT.
|
| Open a file in DVT from the terminal | You can use the
Command Line Interface like this:
|